

So you’ve got your first video—maybe it’s a vlog, a product demo, or birthday video—and you’re staring at a folder of clips wondering, “Okay… now what?” Don’t worry. We’ve all been there. Video editing can feel like a daunting task initially, but with the proper software and a simple, repeatable workflow, it’s a really enjoyable (and rewarding) aspect of the creative process. Enter CapCut Desktop Video Editor, a free and user-friendly video editor packed with features typically found in pro software. If you’re just starting, it’s one of the better tools you can use to learn the ropes without getting bogged down. Notably, CapCut even includes smart features like text-to-speech tools, making it easier for beginners to add professional-sounding narration without recording their voice.
In this tutorial, we’re going to walk you through a brief five-step process for editing your first (or second) video using CapCut Desktop. No fluff—just a simple-to-follow journey from raw video to polished project.

Why Use CapCut Desktop Video Editor
Let’s dive into the steps first, and then we’ll tackle the question: Why CapCut? Watermark-free and ad-free: Unlike the majority of free editors, CapCut won’t add a watermark to your output. Intuitive interface: The timeline, tools, and panels are all easy to learn. Included with features: Transitions, effects, keyframes, auto-captions, music, and more. Rapid export options: Even for resolutions such as 1080p and 4K. Whether you are creating videos for YouTube, TikTok, or just sharing among friends and relatives, CapCut gives you the essentials and a bit more.
Thanks to features like the AI video generator, you can even automate parts of the creation process, generating unique visual content to pair with your audio more effortlessly.
Step 1: Import and Organize Your Footage
All good edits start with a clean slate, and CapCut makes it easy to get started by simplifying the process of importing your clips. Open CapCut Desktop and click on “New Project.” Use the left-hand Import panel to bring in all your media, including video footage, images, soundtracks, voiceovers, and more.
Once your media is imported, drag your primary footage onto the timeline at the bottom of the screen. With your clips now on the timeline, arrange them in the general order you want your story to flow. It doesn’t have to be perfect yet—just aim for a rough cut you can build from.

Step 2: Trim, Cut, and Clean Up
This is where you start transforming a sequence of random clips into a seamless, watchable film. Begin by trimming out unwanted portions of your video using the Split Tool (Ctrl + B), and refine each clip by clicking and dragging from the edges. You can reshuffle or remove clips as needed by simply dragging them around or hitting the Delete key on your keyboard.
As you work, keep an eye out for uncomfortable silences, shaky or unstable shots, and moments that repeat or slow down the rhythm of your video. Aim for a clean, tight edit that gets your message across without dragging—remember, less is more, especially when you’re just starting out.

Step 3: Include Music, Voiceovers, and Audio Adjustments
Audio makes up half of the video experience—sometimes even more. Good music and sound can completely transform the tone of your project. To add background music, head to the Audio tab and either browse CapCut’s free music library or upload your own track.
Drag your chosen song onto the timeline beneath your video and use the Volume panel to balance the sound, ensuring the music doesn’t overpower your voice or main footage. If you need a voiceover, you can easily record one by tapping the “Record” button in the Audio tab, or you can import a pre-recorded voice track and drag it onto the timeline.

Step 4: Add Text, Transitions, and Effects
To add text to your video, open the Text tab, select Default Text, and place it onto the timeline. You can customize the text directly in the preview window by adjusting the font, size, color, and placement.
To smooth the flow between clips, use transitions by clicking the small box between two clips on the timeline. Choose from options like fade, slide, glitch, or zoom, and drag your selected transition into place.
You can also enhance your video with visual effects or filters from CapCut’s “Effects” tab, such as light leaks, blur effects, retro VHS styles, or motion advancements. Simply drag the effect onto your timeline or clip and fine-tune its intensity with sliders, but remember, a little goes a long way; effects should support your story, not overwhelm it.
When your video looks and sounds the way you want, it’s time to add the finishing touches. Start by checking your timeline—watch your video from start to finish at least twice, keeping an eye out for audio sync issues, awkward cuts, typos in text, and irregular volume levels. If you want to get creative, CapCut also allows you to tweak voices with a voice changer tool, offering fun and dramatic shifts that can add a layer of personality to your project.

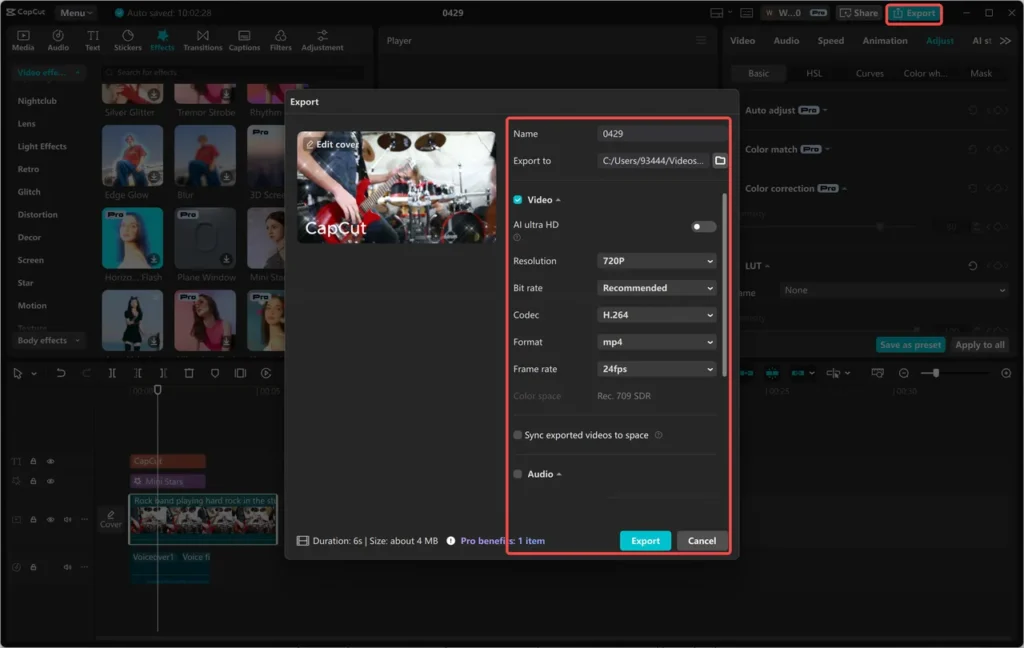
Step 5: Last Review and Export
Once everything is polished, click the Export button in the top right corner. Choose your export settings: 1080p resolution for most projects, 720p for faster uploads, or 4K for the best quality; MP4 format for compatibility with YouTube and most platforms; and a frame rate of 30fps for standard videos or 60fps for ultra-smooth motion.
Finally, click Export, name your file, and select a save location. Your video is now ready to be saved, shared, or uploaded for the world to see!
Bonus Tips for Newbies Keep it short:
Aim for 1–3 minutes when you’re starting out. Short videos take less time to edit and will engage your audience. Save often: CapCut is solid, but it doesn’t hurt to save what you’ve got as you go. Experiment: Don’t be afraid to experiment with various looks or sounds. Experiment and find what works. Watch tutorials: There are hundreds of YouTube producers who are sharing CapCut editing secrets for free—learn from them and create your own style.
Final Thoughts
Starting video editing doesn’t have to be intimidating. CapCut Desktop makes it simple, even enjoyable. With its user-friendly interface and advanced features, newcomers can progress from “I don’t know where to begin” to “Check out this cool video I just created” in a couple of editing sessions. With this five-step process—import, trim, add audio, enhance, export—you’ll have a good starting point to work from and extrapolate your skills to begin creating content that actually sounds and looks professional. Take the leap, fire up CapCut Desktop, and start sharing your story—one fade, cut, and soundtrack at a time.
Related posts:
 Encountering 127.0.0.1:62893: Unveiling the Localhost Mystery
 Master the Art of Video Creation with MiniTool MovieMaker
 What Features Should You Look for in BrowserStack Alternatives?
 From Downtime to Uptime: SynchroNet’s Secret to Seamless IT
 How Technology Can Help Make Deserts More Habitable for Humans
Leave a Reply