

As autumn air turns crisp, leaves change color, and the magic of Halloween fills our thoughts. This special season brings a thrill of spooky fun. Few things set a mood like flickering candlelight. It changes any space into something truly enchanting.
Making your own DIY Halloween candles offers a creative, low-cost way to boost your holiday decor. You get to add a special touch to every corner. The satisfaction of crafting unique pieces, perfectly tuned to your style, is hard to beat.
Remember, though, safety comes first when making or using candles. We will share some important tips to keep your spooky creations fun and safe.
Why Make Your Own Halloween Candles?
Unique & Customizable Designs
Store-bought Halloween candles often offer limited choices. They may not quite fit your vision. When you make your own, the design possibilities are endless. You can pick exact scents, colors, and decorations to match any Halloween vibe. Imagine gothic elegance, whimsical charm, or a classic spooky feel. Your candles will be truly one-of-a-kind.
Cost-Effectiveness
Buying fancy, decorative Halloween candles can quickly empty your wallet. Crafting them at home is far more budget-friendly. The raw materials for DIY candles cost much less than buying ready-made ones. You can save a lot of cash, which leaves more for candy or costumes.
Creative Outlet & Relaxation
Making candles is more than just a craft; it is a calming activity. The process of choosing scents, mixing colors, and watching wax cool can be very soothing. During the busy holiday season, this creative time lets you unwind and enjoy the simple joy of making something with your hands.
Essential Materials for DIY Halloween Candles
Candle Making Basics
To start your candle journey, you will need a few core items. First, choose your wax: soy wax burns cleaner, paraffin holds scent well, and beeswax is natural. Next, pick wicks; pre-tabbed cotton wicks are easiest for beginners. You will also need containers like glass jars, metal tins, or silicone molds. You can even reuse old jam jars for a rustic look. A pouring pot and a thermometer are a must for safe wax melting. Lastly, grab some stirring sticks for mixing.
Halloween-Specific Additions
Now for the spooky fun. Add color with liquid dyes, wax blocks, or mica powder. Always use dyes made for candles. For scent, pick Halloween favorites like pumpkin spice, crisp apple cider, warm clove, cinnamon, or even candy corn. Decorations like dried flowers or herbs add charm, but use them very carefully to avoid fire risk. Biodegradable glitter can add sparkle. Small embeds like plastic spiders or tiny ghosts can be fun, but remember they must be placed far from the wick. Essential oils offer natural scents, but they might not burn as strongly as fragrance oils.
Safety Equipment
Safety is key when working with hot wax. Always wear heat-resistant gloves to protect your hands. Eye protection, like safety glasses, shields your eyes from splashes. Cover your work surface with old newspapers or towels. This protects your counters from spills and makes cleanup easy.
Simple DIY Halloween Candle Projects
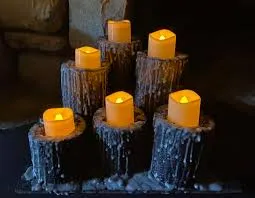
Spooky Spiderweb Pillar Candles
These candles bring a creepy, textured look to your decor.
Preparing the Mold and Wick
First, choose a pillar candle mold. Make sure it is clean and dry. Thread your wick through the bottom hole of the mold and secure it at the top. This keeps it straight. Then, slowly pour your melted wax into the mold.
Creating the Spiderweb Effect
As the wax cools, it will start to harden. This is your chance to make the web. Use a skewer or toothpick to draw circles from the center outwards. Do this as the wax cools but is still soft. For a different look, you can pour a thin layer of dark wax first, let it set, then pour a lighter color over it to show the web design.
Adding Halloween Scents and Colors
To make it truly Halloween, use orange or black dye for the wax. Add a scent like “ghostly graveyard” or “spiced pumpkin pie.” These scents will match your spooky design perfectly.
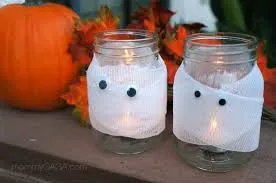
Ghoulish Jar Candles with Embedded Objects
These projects are easy and use jars you might already have.
Preparing and Decorating the Jars
Wash any old glass jars well and let them dry. You can paint the outside of the jars with spooky designs, like bats or bare trees. Make sure any paint is not flammable and stays away from the top edge where the flame will be. This keeps everything safe.
Layering Wax and Embeds
Pour different colored wax layers into the jar. Try black on the bottom, then orange, then purple for a striking effect. For embeds, you can place small plastic spiders on the outside rim of the jar. If you want to put things in the wax, they must be non-flammable. Position them carefully far from the wick so they do not catch fire or melt.
Choosing Thematic Scents and Wick Placement
Pick scents that match your ghoulish theme, like “midnight rain” or “haunted woods.” Make sure your wick is centered in the jar. This helps the candle burn evenly and fully.
Floating “Witch’s Brew” Tealights
These small candles are quick to make and add a mysterious touch.
Creating a “Swampy” Look
Use green and brown dye to give your wax a murky, swampy appearance. Add a tiny pinch of biodegradable glitter for a subtle shimmer. This makes your “brew” look truly magical.
Adding Floating Charms (Safely)
For a unique touch, you can tie small, heat-resistant charms to the very top of the wick above the wax line. These charms will not melt or fall into the wax. You can also glue charms to the outside of the tealight cup for safety. Remember, never put anything into the wax that can melt or burn.
The “Brewing” Effect
Place your finished tealights in a large bowl of water. Add some faux cobwebs or use dry ice in the water for a steaming, bubbling “brew” effect. This makes for a fun, spooky display that will impress your guests.
Advanced Techniques & Safety Tips
Achieving Smooth Finishes and Avoiding Imperfections
Even experienced makers can run into problems like sinkholes or rough tops. But there are ways to fix them.
Proper Pouring Temperatures
The most common reason for imperfections is pouring wax at the wrong temperature. Each wax type has a best temperature range for pouring. Using a thermometer is vital. Pouring too hot can cause cracking. Too cold can lead to rough tops.
Double Boiler Method for Gentle Heating
Always melt your wax using a double boiler. This means placing a smaller pot of wax inside a larger pot of boiling water. This method melts the wax slowly and evenly. It stops the wax from getting too hot or burning.
Fire Safety: Essential Precautions for Halloween
Candles add charm but need careful handling.
Never Leave Burning Candles Unattended
This is the most important rule. Always blow out candles when you leave a room or go to sleep. A forgotten flame can quickly become dangerous.
Keep Away from Flammable Materials
Place your candles on stable, heat-safe surfaces. Keep them far from curtains, paper decorations, and anything that can easily catch fire. Also, ensure they are out of reach of pets and small children.
Trimming Wicks and Burn Time
Before each use, trim your wick to about 1/4 inch. A shorter wick gives a smaller, safer flame. It also helps your candle burn cleaner and last longer. Do not burn candles for more than 4 hours at a time. This stops the container from overheating.
Creative Candle Embellishment Safety
Adding decorations makes candles special, but safety is key.
Embedding vs. Surface Decoration
Any item you embed in the wax must be non-flammable. It also needs to be placed well away from the wick’s flame path. Often, it’s safer and just as pretty to decorate the outside of your candle container. This way, nothing inside the wax can ever catch fire.
Using Heat-Resistant Embellishments
Stick to heat-resistant items for decorating. Think metal charms or glass beads. These can be glued to the exterior of your candle jars or molds. They add sparkle and theme without creating any fire risks.
Decorating with Your DIY Halloween Candles
Your handmade candles are ready. Now, let’s put them to work!
Creating Spooky Centerpieces
Your DIY Halloween candles make perfect focal points for any table.
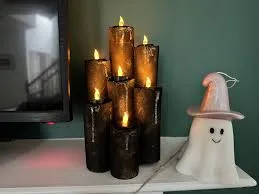
Candle Groupings and Varying Heights
Arrange candles of different sizes and shapes together. Tall pillar candles next to smaller jar candles create visual interest. This makes a dynamic display that draws the eye.
Incorporating Natural Elements
Pair your candles with natural Halloween finds. Add small pumpkins, gourds, fallen leaves, or twisted branches. These natural elements blend beautifully with candlelight for an earthy, spooky vibe.
Setting the Mood for Parties and Trick-or-Treaters
Candles can transform your home’s atmosphere for guests and trick-or-treaters.
Illuminating Pathways
Line your walkway with luminaries or jar candles. This guides trick-or-treaters to your door and gives your home a warm, eerie glow. It makes the path feel magical.
Creating Ambiance Indoors
Inside, use your candles to cast long, eerie shadows. Dim the main lights and let the candle glow take over. This creates a cozy, spooky feel, perfect for a Halloween party or a quiet night of scary movies.
Conclusion
Making your own DIY Halloween candles is a rewarding craft. It gives you unique decor and helps save money. Beyond that, it offers a fun, creative way to relax. Each handmade candle adds a special touch to your holiday.
Why not try one of these projects yourself? Make a spooky spiderweb pillar or a ghoulish jar candle. Share your creations and the joy of crafting. Let your handmade touches light up the magic of Halloween this year.
Related posts:
 Best Hair Fall Treatment in Dubai: What Really Works in 2025?
 Beware of Calls from 683786714 – Is It a Scam or Spam? Here’s What You Need to Know
 What Is Global Campaign for Education Action Week?
 Secure Your Scrolling Reels with a VPN: A Step-by-Step Guide
 Essential Questions to Ask When Choosing a Law Firm in Cincinnati
Leave a Reply